
As I have vaguely talk about how this web page was built in the previous blog, I would go into a bit more detail here.
Motivation
I have tried with complex framework like Hexo and Gatsby or simple frameworks like React, Vue and Svelte to build my blog, but I want to build something that’s really suits for my use. Here are my requirements:
- Completly free (I’m just a student).
- Fast.
- Client Side: I don’t need a JS framework to build a blog on the client side, that takes time and resources.
- Server Side: I want it to be equally fast around the world. Something delivers on Edge framework or CDN.
- Build Fast: I don’t want to wait for a long time to build the site.
- Fully customizable
- Use multiple themes and even multiple frameworks in one application.
- Use and re-use my own components.
- Simple.
- I don’t want to learn a new language or framework.
- I don’t want to use a complex build system.
- I don’t want to use a complex routing system.
- SEO friendly
Techniques?
This site is built with Astro and TailwindCSS powered by Cloudflare. I will go into more detail about each of them.
Why Astro?
Astro is a static site generator, which means that it compiles your pages into static HTML files. This is great for SEO and performance.
I don’t need dynamic data(for now) Which means that I just want plain HTML files. However, I still want to re-use components with static data. Something like
static data => component => static htmlAstro also has a great support for Markdown and MDX which is great for me as I write my blog in Markdown.
Astro’s component syntax is very similar to React’s JSX, which is very easy to get started with and generate static HTML with it.
For example:
---
const CVProjects: CVProj[] = [
  {
    name: "Listen1",
    desc: "A music application in the form of browser extension and Electron Application, built on Typescript, Vue 3, Electron and Tailwind Css. Featuring more than 2M users and downloads.",
    href: "https://github.com/listen1/listen1_chrome_extension",
  },
  {
    name: "CaSMM",
    desc: "Computation and Science Modeling through Making Full Stack Web App",
    href: "https://github.com/STEM-C/CaSMM",
  },
]
---
<ul class="mt-6 text-lg space-y-2">
{CVProjects.map(({ name, desc, href }) => (
  <li>
    <a {href} class="font-semibold hover:underline">
        {name}
    </a>
  - {desc}
</li>
))}
</ul>
This was inspired by lcas.dev/cv. You can find above code here
Why Tailwind?
TailwindCSS is a utility-first CSS framework. This means that you can use classes instead of style block to style your elements and each you don’t need to consider the possible side effects of styles from parent or global styles. And it makes to don’t have to go back and forth between CSS and HTML files when writing and debugging code.
Why Cloudflare?
Cloudflare is a CDN and a DNS provider. It has a great support for static sites and it’s free for static sites. It also has a great support for Workers which is a serverless function that runs on Cloudflare’s edge network.
I use Cloudflare Pages to build and deploy my site. It’s free for static sites and it enables fast response time throughout the world. I’m also planning to use Cloudflare Functions and Workers KV to build a serverless API for my site’s commenting system.
Result:
I’m able to generate static pages with my own components and styles. I’m also able to use the same components in different pages.
▶ src/pages/index.astro
└─ /index.html
▶ src/pages/blogs.astro
└─ /blogs.html
▶ src/pages/blog/make-electron-app-in-windows-more-native.mdx
└─ /blog/make-electron-app-in-windows-more-native.html
▶ src/pages/blog/how-i-built-this.mdx
└─ /blog/how-i-built-this.html
▶ src/pages/blog/helloworld.mdx
└─ /blog/helloworld.html
▶ src/pages/404.astro
└─ /404.html
▶ src/pages/cv.astro
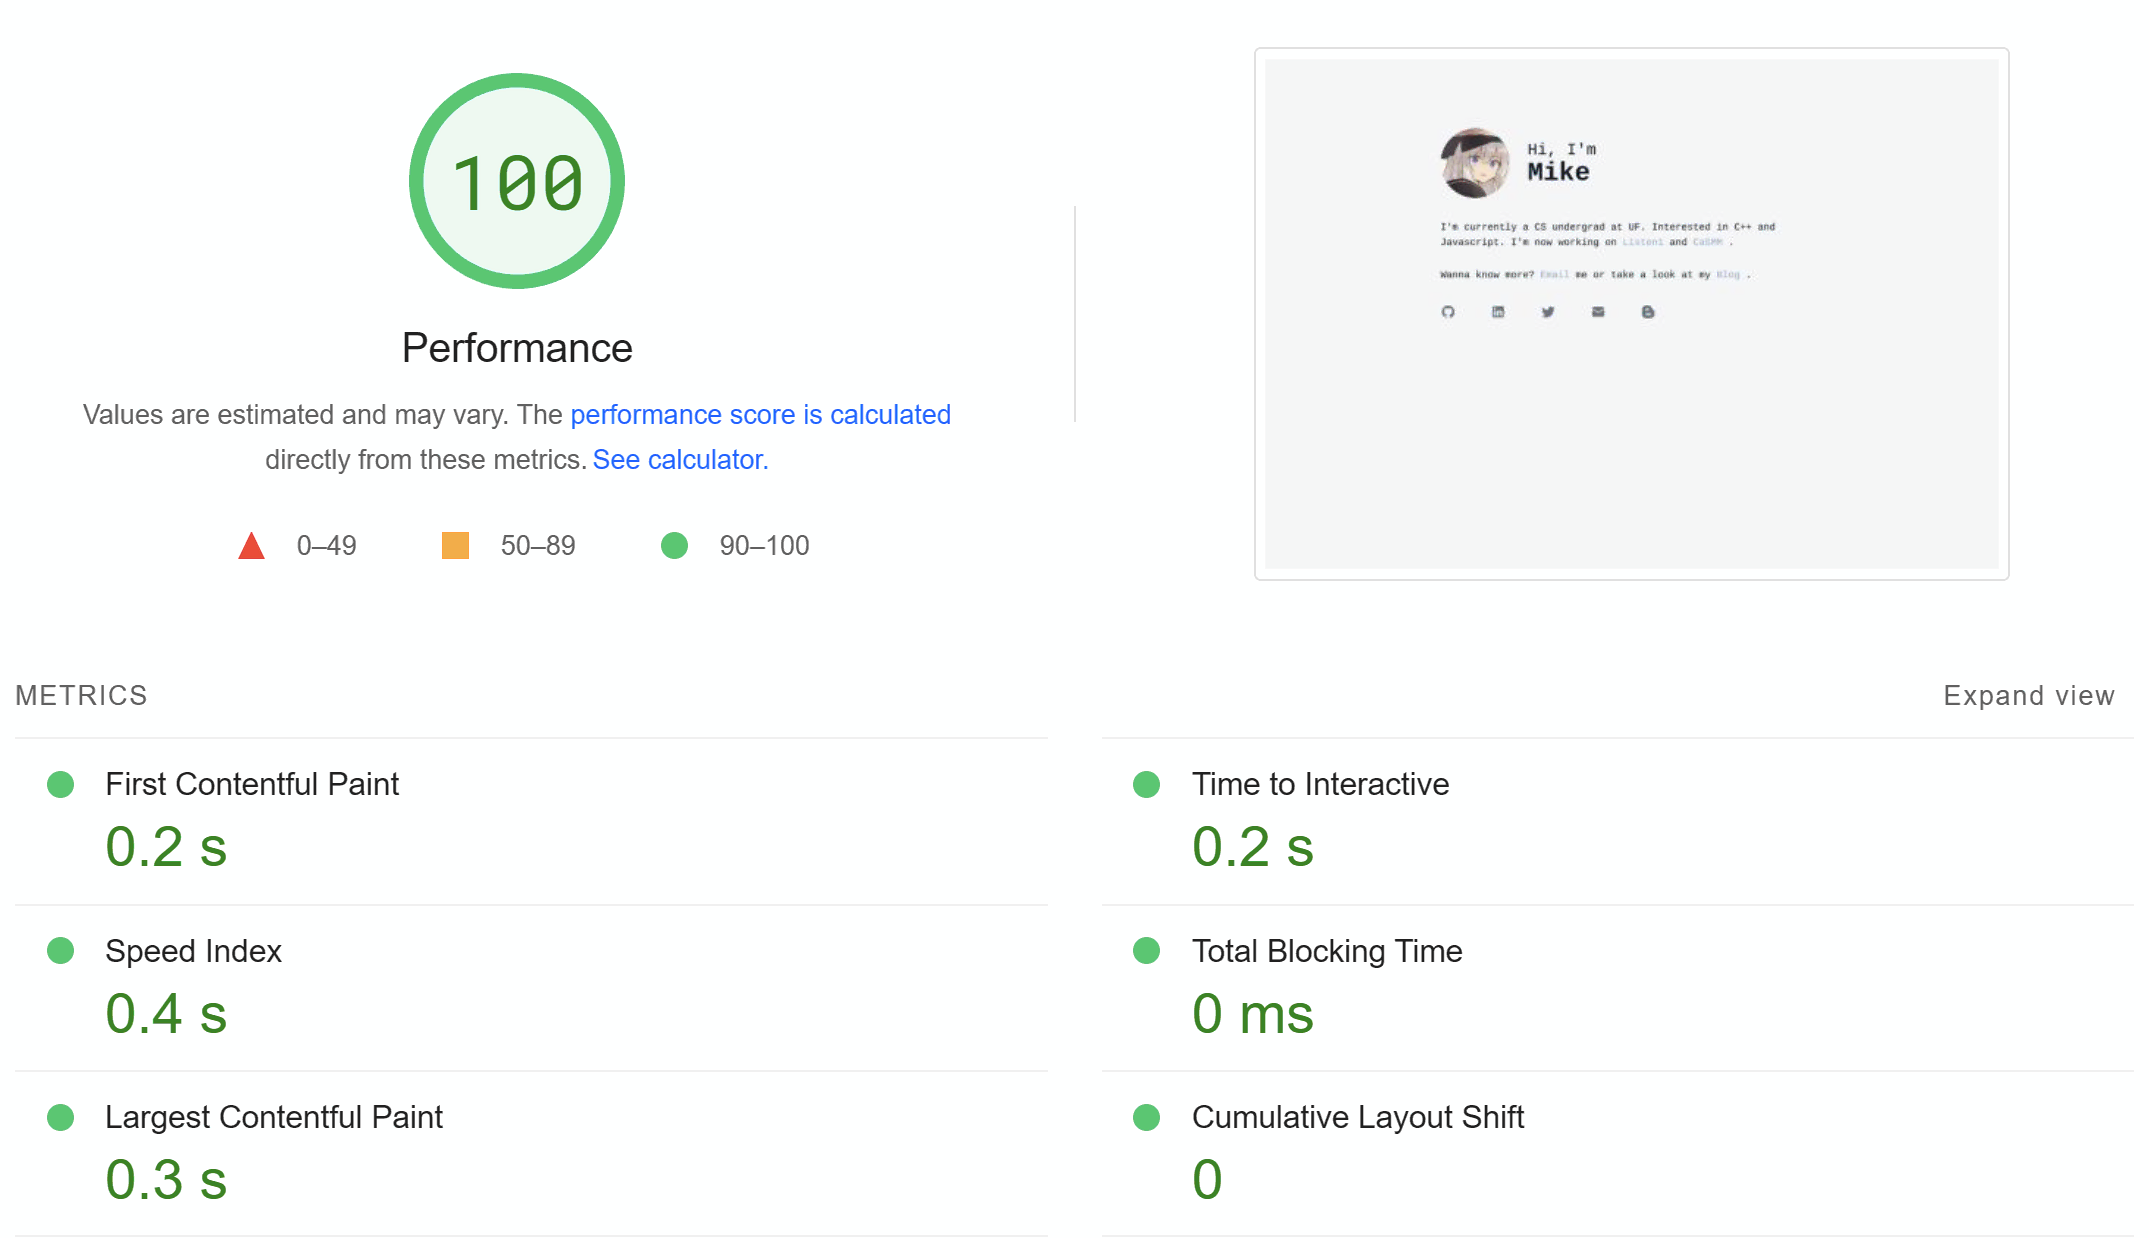
└─ /cv.htmlPerformance
Also, to accelarate the speed even more, I used Webp to compress the images.I used
cwebp -q 50 -m 6 '.\Elaina.png' -o Elaina.webpWhile the quality is set to 50 and use the slowest compression method, the size is reduced from 330kb to 18kb with nearly no visual loss.
I would also recommend using -near_lossless to get a near lossless image.
cwebp -near_lossless 0 -z 9 '.\bench.png' -o bench.webpThe below bench image is generated with the above command.
ALso, to make sure the image won’t block the loading process the images are lazy loaded.
<img src="/assets/bench.webp" alt="benchmark" width="800" load="lazy" />This leads to incredibly quick response time and SEO friendly and no potential computations.
What’s next?
I’m planning to add more contens to my blog and also add more features to the site. Like a search bar on blogs.
And also, manually compressing images is a bit tedious, so I’m planning to add a script to automate the process or use <Image> component from Astro to help me do that.
I’m also planning to add a comment system with Cloudflare Pages Function, Workers KV and AWS DynamoDB to my site as I mentioned above. Stay tuned!
after some research, I found that utterances is a easy and convenient way to add comments to my site. So I’m going to use that instead.
Sources
The styling of the blog is inspired by lcas.dev